Add content to a learning module
To add content to a module, expand the module by clicking in the gray bar where the module name appears. Any subfolders will open in the same way.
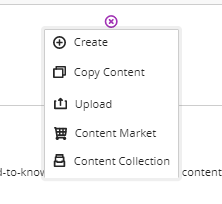
Click the plus sign. A list of options opens.

Create folder
- In the learning module, click the plus sign.
- In the list that appears, select the Create option
- In the right pane, click the Folder option
- In the side panel that opens
- Enter a name for the folder
- Choose whether the folder and its contents should be displayed or hidden from the participants
- Please enter a description
- Click the Save button
Note! You cannot create additional subfolders in a subfolder. The system supports only two levels.
Upload a file
- At the desired place in the course, click on the plus sign.
- In the list that appears, select the Upload option
- A window showing the contents of the computer opens
- Select one or more files, and then click Open
- Supported file types include DOC, DOCX, HTM, HTML, MP3, MPG, PDF, PPT, PPTX, XLS, XLSX, RTF, TXT, ZIP and the most common image types.
- The files are uploaded.
- Specify whether to display the file to participants.
By default, the link to the file gets the same name as the file name. To make it clearer to users, one should edit the link name.
- Click on the three points to the right of the document / select Edit.
- In the panel that opens edit change the link name, which appears at the top.
- Finish by clicking the Save button
Create a link
- At the desired place in the course, click on the plus sign
- In the list that appears, select the Create option
- In the panel that opens on the right, select Link
- Name the link (at the top of the panel)
- Enter the address of the web page (link URL)
- Please enter a description (max 250 characters)
- Finish by clicking the Save button
